Airsoft Squad Formations: Column, Wedge, Line & Echelon
Master airsoft squad formations: column, wedge, line and echelon. Learn 5-10 m dispersion, sectors of fire, the clock method and fire team roles for the woods.
The single most common mistake an inexperienced airsoft squad makes is moving as a “school of fish” — bunched up, everyone within a few meters of everyone else. It feels safe. It is the opposite of safe. A formation is the ordered arrangement of a squad on the ground, and choosing the right one is the difference between losing one player to a contact and losing all of them to a single burst.
Dispersion: why you never bunch up
Dispersion is simply spreading the squad across an area. The reasoning is brutal and arithmetic: it is far easier for the enemy to spot — and eliminate — players who are bunched together. If the squad walks as one tight knot, a single burst or a well-placed ambush takes out everyone at once. Spread out, the worst case is one player down while the rest react. Spacing also gives every player his own sector of ground to watch and cover. How wide you can safely spread depends on cover — see cover vs concealment for why dispersion and real cover work together.
How much space
The general military rule is that distance varies with terrain, visibility and the enemy situation, and is set by the commander or by the squad’s standing procedure. Airsoft sources converge on a practical band: roughly 5 to 10 meters between players in the woods. The Italian airsoft federation’s tactical guide recommends at least 5 m between one player and the next, precisely so the squad cannot be wiped out by a single burst.
- Very thick vegetation, poor visibility: around 5 m — close enough to keep visual contact.
- Open woodland, good visibility: around 10 m or more.
- Never bunched up. Never so far apart that you lose visual or voice contact.
- Never a straight, evenly-spaced line — remember the “S” of spacing, and stagger yourselves.
Frontage vs depth: every formation is a trade-off
A formation defines three things: the distance between players, their sectors of fire, and the squad’s 360° security. Every formation balances two variables that pull against each other:
- Frontage — how much firepower the squad can deliver to the sides, and how wide an area it sweeps.
- Depth — how easily the leader can control the squad, and how much security it has front-to-back.
What is an advantage in one is a weakness in the other. A column has enormous depth and almost no frontage; a line is the mirror image. The four essential formations — column, wedge, line, echelon — are simply four points on that trade-off curve, and a good squad slides between them as the terrain and the threat change.
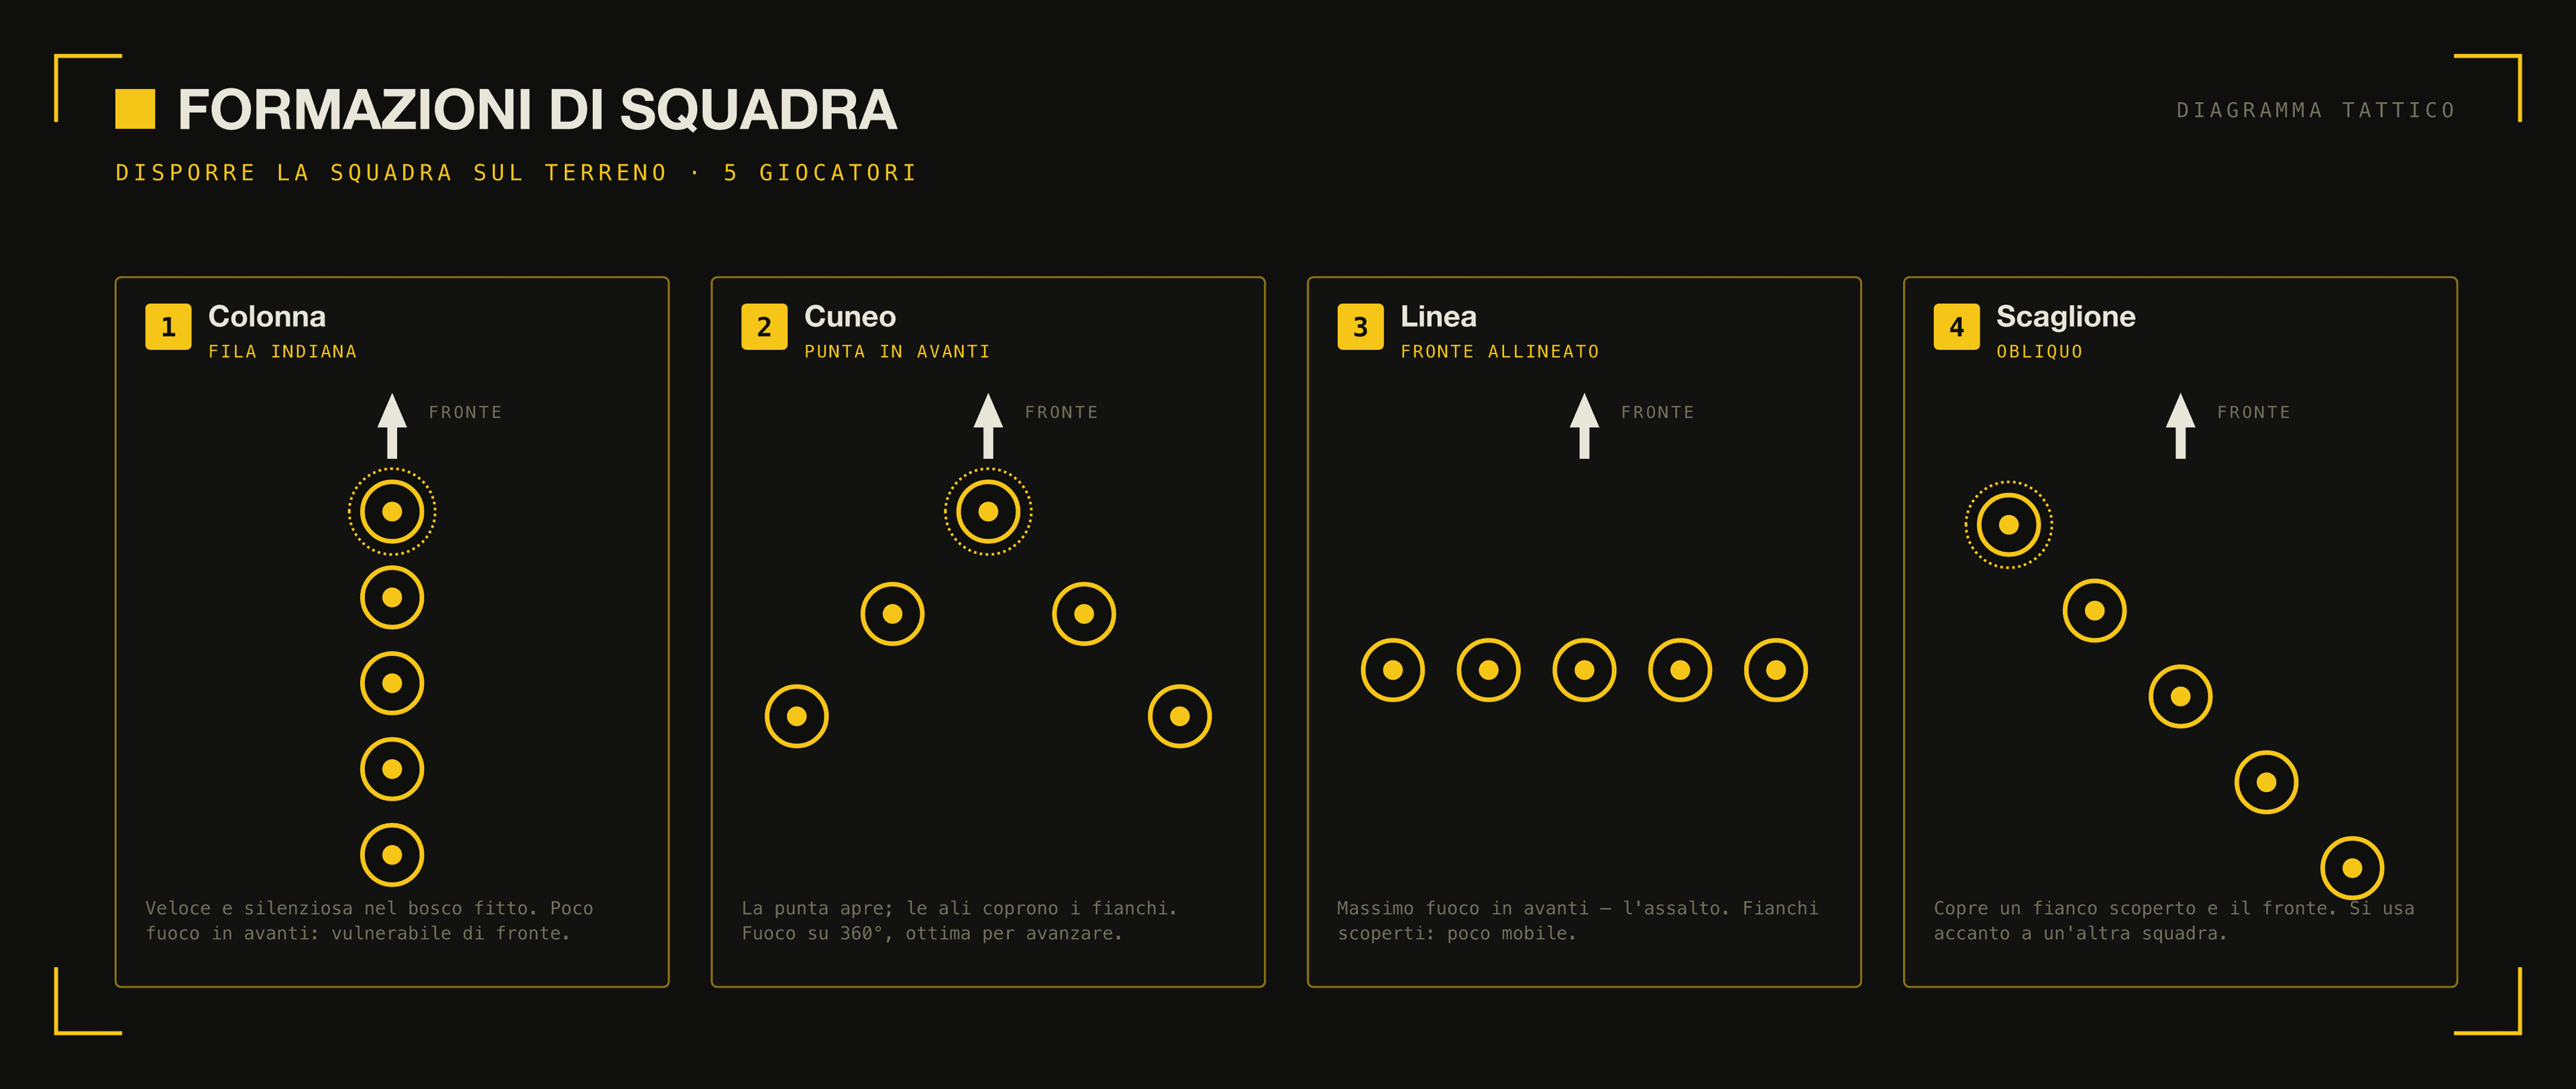
Column / file: depth, speed and control
The column — everyone one behind the other — is the most-used formation in the woods, and the fastest.
- When to use it: closed terrain, thick vegetation, poor visibility. When you simply need to cover ground quickly along a trail or a treeline.
- Advantages: the easiest formation to control; secure flanks — each player covers an alternating side; speed.
- Disadvantages: very little firepower toward the front; the whole squad is on a single path; and it is brutally vulnerable to a flank ambush, because the entire file sits inside the kill zone at once.
That last weakness is the one that matters. A column moving down a logical path — a ridgeline, a forest road, the edge of a clearing — is exactly what a defender sets an ambush against. Use the column to move, not to fight, and break out of it the moment contact becomes likely. When the column is caught, the squad needs a rehearsed battle drill— an instant, wordless reaction — to fight out of the kill zone.
Wedge: the versatile default
In the wedge the leader is at the front, at the apex; the rest of the squad is staggered behind him in an inverted “V,” spread to both sides. It is the base, most versatile formation, and the one a squad should default to whenever the situation is uncertain.
- When to use it: the situation is unclear — contact is possible but not confirmed. This is most of the game.
- Advantages: good control even with limited visibility; protects the front and the flanks; transitions easily into line or column; allows immediate fire in every direction.
- Disadvantages: in very thick woodland it must “close up,” collapsing into something close to a column.
Reference spacing in the wedge is around 10 m between players, contracting as the terrain demands. The rule when it contracts is precise: contract it only until the point where everyone can still see the leader. The instant a player loses sight of the leader, the wedge has stopped working.
Switching from wedge to column or line should be silent: the leader calls the change with a single gesture. Drill the hand signals for each formation so the whole squad can change shape without a word. And within the formation, each player still uses sound tactical movement— cover to cover, never silhouetted — rather than just walking in line.
Line: maximum frontal firepower
In the line, every player is side by side, shoulder to shoulder — but still spaced, not literally touching. It exists for one purpose: to put the maximum volume of fire toward the front.
- When to use it: the assault, or the moment just before it. When you have located the enemy and you are going forward.
- Advantages: frontal fire superiority; it sweeps a wide area.
- Disadvantages: hard to control in the woods; the flanks are exposed; it is slow; and it presents a large “signature.”
The line is a fighting formation, not a moving one. Form it when you are about to assault an objective, and dissolve it back into a wedge or column the moment the assault is over. Walking through woodland in a line is slow, loud and blind to your own flanks.
Echelon: covering a known flank
In the echelon — left or right — the players are arranged on a diagonal. It gives the squad observation and fire toward the front and toward one flank at the same time.
- When to use it: when the threat is on a known side — you want eyes and weapons covering the front and that one flank.
- Disadvantage: the opposite flank is left vulnerable. The echelon is a deliberate bet: you are trading the security of one side to reinforce the other.
Echelon left and echelon right are the same formation mirrored — you pick the side that faces the threat. It is most useful tied to another squad: an echelon can guard the open flank of a friendly element advancing alongside you.
The four formations compared
Read this table as a trade-off curve, not a ranking. There is no “best” formation — only the right one for the terrain and threat in front of you right now.
| Formation | Frontage | Depth / control | Best for | Main weakness |
|---|---|---|---|---|
| Column / file | Low | High — easiest to control | Thick terrain, speed, covering ground | Flank ambush — whole file in the kill zone |
| Wedge | Medium | Good — works with low visibility | Uncertain situations — the default | Must close up in very thick woods |
| Line | High | Low — hard to control | Assault and pre-assault | Exposed flanks, slow, large signature |
| Echelon | Medium (front + one flank) | Medium | Threat on a known flank | Opposite flank left vulnerable |
Sectors of fire and the clock method
Whatever formation you are in, every player is given a sector of responsibility — a slice of the field of view that it is his job to observe and cover. The sectors deliberately overlap so there are no gaps a threat can slip through.
The tool that makes this fast to assign is the clock method. It gives the whole squad one shared reference frame:
- The direction of march is always 12 o’clock.
- The rear is 6 o’clock.
- The leader assigns slices — “you cover 10 to 2,” “you cover 2 to 6,” and so on.
During a halt this closes a full 360° circle of security around the squad: every direction is somebody’s responsibility, and the overlaps mean no slice is watched by nobody. The clock works because it is relative to the squad, not the compass — 12 stays 12 even as the squad turns, so a call of “contact, 3 o’clock” is instantly understood by everyone.

Squad roles: the cell structure
An organized airsoft squad — the “patrol” of the Italian manuals — typically runs 8 to 10 players, and it is built up from smaller cells:
- The pair — the basic tactical cell: two players who cover each other, complement each other, and never lose sight of one another. If one is eliminated, the survivor attaches to another pair.
- The brick (half-patrol) — two pairs; the smallest unit that still contains every essential role.
The roles
| Role | Function |
|---|---|
| Team leader | Decides the tactics, the type of movement and the route. Needs experience, calm, imagination and leadership. Sits around the 3rd–4th position. |
| Scout / point | “The eyes of the patrol.” Moves at the front, leads along the route, needs stealth, reflexes and instinct — must sense an ambush before walking into it. Provides frontal security. |
| Navigator | Guides the route: reads the map, feeds the scout distance and direction in real time. Sits just behind the point, alongside the team leader. |
| Gunner | Provides volume of fire to support the movement of the others. Carries plenty of ammunition and a high rate-of-fire replica. |
| Flanker | Breaks off from the main body to work around the enemy’s flank and take them from the side or rear. Needs speed and orientation. |
| Rear security / tail | Watches the squad’s rear, on the move and in halts; prevents threats from behind. If the tail fails, the squad is eliminated from the back. |
| Sniper | Rarely used in airsoft because of the limited range of replicas; needs cold blood, silent movement and mastery of camouflage. |
Even in a small, informal airsoft squad, you should distribute at minimum three jobs: who is the point, who is the leader, who is the tail. Without that, nobody is looking behind you and nobody is making decisions — and a squad with no point and no tail is just a crowd waiting to be ambushed. Once the roles are set, the formation actually moves by bounding overwatch— one element covers while the other advances — so the squad never crosses open ground without someone watching the threat.
This is also where a shared tactical layer changes the game. Tattica Six puts every squad member’s real GPS position on one live map, so the team leader can see the formation hold or collapse in real time — the moment the wedge stretches past 10 m or a flanker drifts out of contact, it is visible on the screen instead of discovered during a contact. The briefing module pre-assigns roles and sectors before the game: point, navigator, gunner, tail, each clock sector mapped to a player, so the whole squad walks in already knowing the formation, who owns which slice, and where the rally point is.
FAQ
How far apart should airsoft players spread in the woods?
Roughly 5 to 10 meters between players. In very thick vegetation with poor visibility, close to 5 m so you keep visual contact; in open woodland, 10 m or more. Never bunch up, and never spread so far that you lose visual or voice contact. The Italian airsoft federation recommends at least 5 m precisely so a single burst cannot eliminate the whole squad at once.
Which formation should an airsoft squad use most of the time?
The wedge. It is the base, most versatile formation: it protects the front and the flanks at once, works with limited visibility, lets the squad fire immediately in any direction, and transitions cleanly into column or line. Use the column for thick terrain and speed, the line only for assaults, and the echelon when the threat is on a known flank.
What is the clock method for sectors of fire?
It is a shared reference for assigning who watches where. The direction of march is always 12 o’clock and the rear is 6 o’clock. The leader assigns slices — “you cover 10 to 2,” “you cover 2 to 6” — and the slices overlap so there are no gaps. During a halt this closes a full 360-degree circle of security around the squad.
Why should the second-in-command not pair with the leader?
Because if a single burst or ambush catches both of them, the squad is decapitated of its command in one stroke. The 2IC must stay separated from the leader, in a different cell and not too close, so that one player going down never removes both the decision-maker and the backup at the same time.
Coordinate your next game with Tattica Six
Live GPS map, push-to-talk and shared briefing — for the squad that takes airsoft seriously.
Explore Tattica Six