Airsoft Battle Drills: React, Break Contact, Attack
Airsoft battle drills explained: react to contact, react to ambush, break contact, squad attack and setting an ambush — the 5 squad drills to rehearse to reflex.
The first burst of incoming fire is where games are won and lost. A squad that has never rehearsed what happens next will scatter, freeze, or shoot in four different directions. A squad that has drilled it moves as one organism — cover, return fire, report, decide — almost without a single order being spoken. That is a battle drill, and there are five every airsoft team should own.
What a battle drill is — and why it must be reflex
A battle drill is a trained collective action, executed almost without orders, by reflex. The concept comes straight from military doctrine — the Ranger Handbook devotes a whole chapter to them — and it translates cleanly to airsoft. The value of a drill is that the entire squad does the same thing, in the same moment, without needing to stop and debate.
That last part is the whole point. Under a sudden volume of fire, human beings do not hold committee meetings. They do whatever they have practised. If the squad has practised nothing, the “plan” collapses into a dozen private panics. So a drill is only a drill once it has been rehearsed until it is instinct — until noise, fear and surprise can no longer break it.
The five drills below build on each other. React to contact is the root: every other drill is a decision the leader makes after the squad has already reacted to contact. Learn that one cold first.
React to contact: the airsoft squad’s root drill
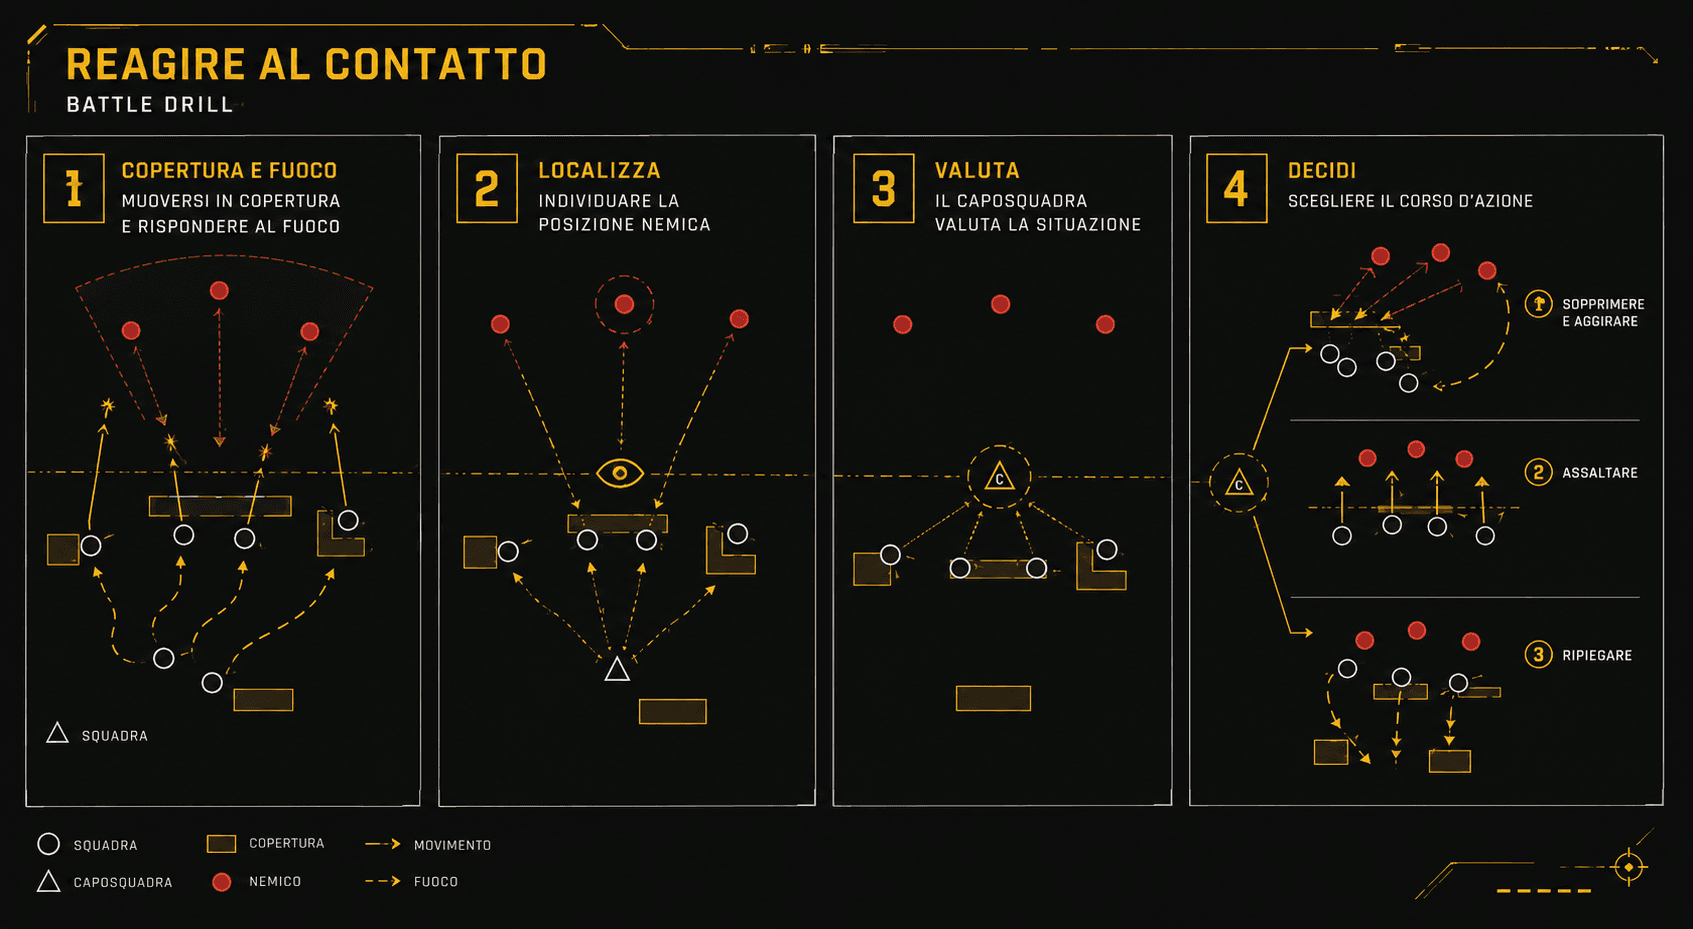
The situation: the squad receives enemy fire. This is the foundational drill — the automatic sequence that buys the leader the seconds needed to decide what to do next. It works best with a squad already in a sound formation, spaced so a single burst can’t catch everyone.
The sequence:
- Immediately, the exposed players take the nearest cover and return fire in the direction of the contact.
- Players locate the enemy positions — by sight and by sound — and put well-aimed fire onto them.
- The leader of each pair or sub-team controls the fire and passes the information up to the squad leader.
- Every player keeps contact with the teammates on their left and right, and reports the enemy position.
- The team leaders check the status of their own people.
- The squad leader moves toward the element in contact and makes the situation assessment: where the enemy positions and obstacles are, the size of the enemy force, whether a vulnerable flank exists, and whether a covered and concealed route exists to get around it.
- On that basis the leader decides the next move: suppress and flank (fire and movement), assault, or break contact.
When you take cover on contact, take real cover — something that actually stops BBs, not just a bush that hides you. Concealment buys you a second; cover buys you the fight.
React to ambush: near vs far ambush response
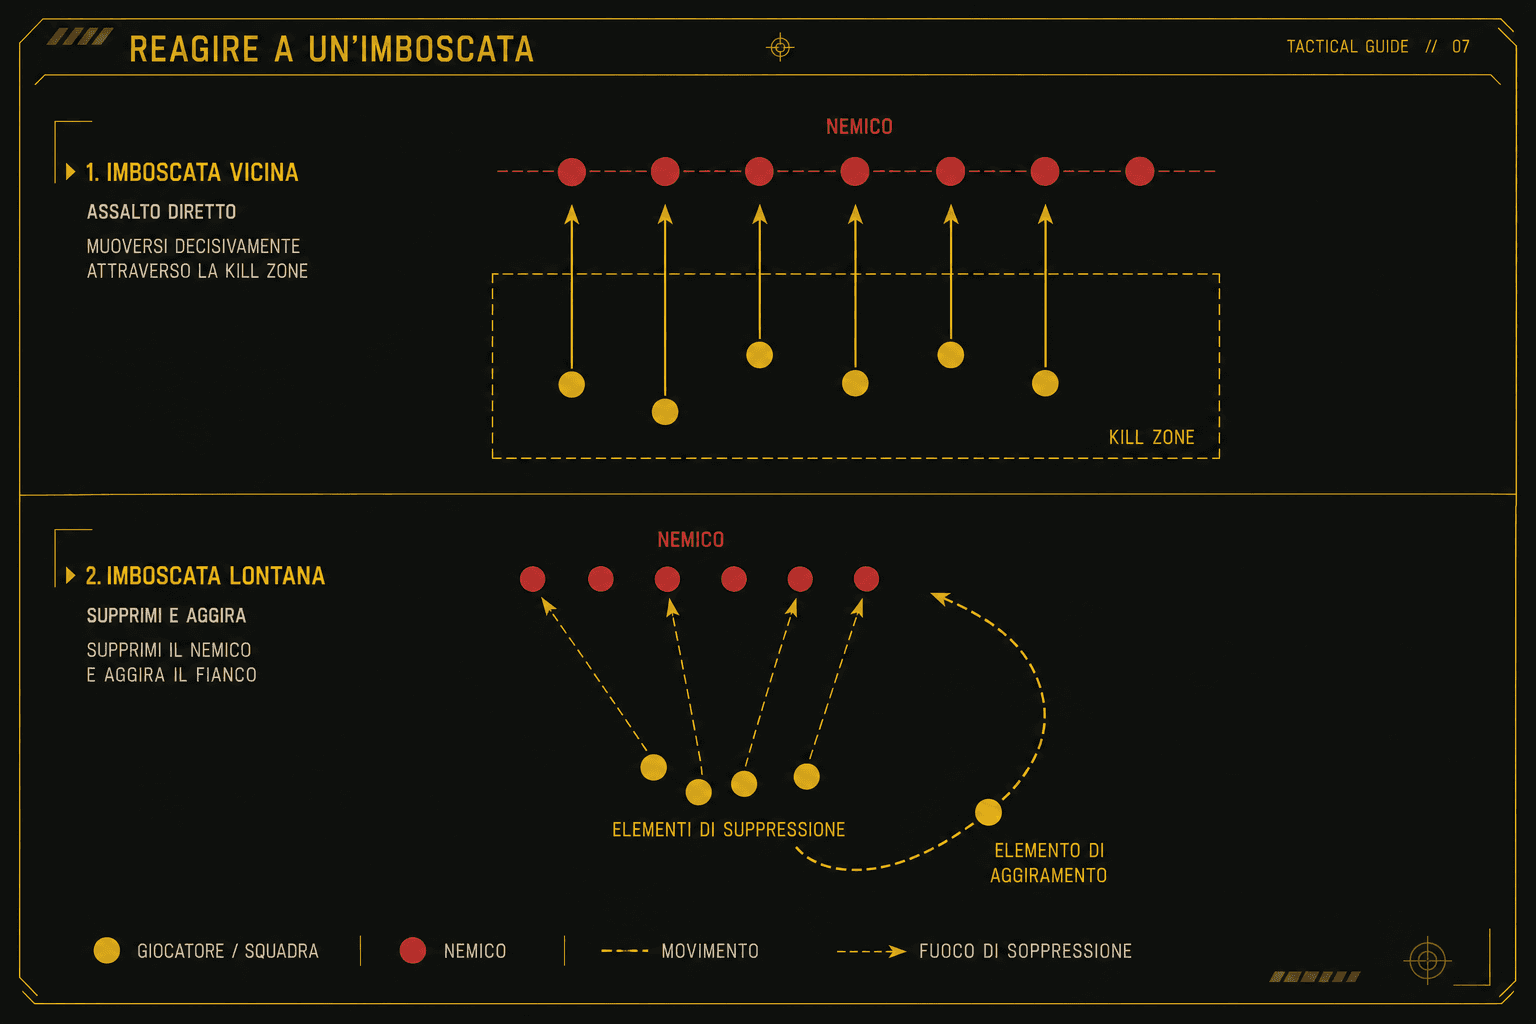
The situation: the squad walks into a kill zone and the enemy triggers a sudden, high-volume attack. Unlike a chance contact, an ambush is prepared, concentrated and aimed at you specifically. The correct response depends on the distance of the ambush.
Near ambush — enemy within grenade range
When the enemy is close, there is no time and no room to manoeuvre cleanly. The drill is violent and counterintuitive:
- Whoever is in the kill zone taking fire immediately returns fire, seeks cover, and — if the field allows it — throws a grenade or smoke.
- The players in the kill zone assault THROUGH the ambush — out of the zone, toward the enemy, with fire and movement.
- Whoever is not in the kill zone locates the enemy positions, opens immediate suppressive fire, and shifts that fire as the teammates assault through.
Far ambush — enemy outside grenade range
When the enemy is farther off, there is room to do something more deliberate:
- Whoever is taking fire returns fire, seeks cover and suppresses the enemy — prioritise silencing the highest-rate-of-fire weapons; use smoke to obscure.
- Whoever is not under fire moves along a covered and concealed route to a vulnerable flank of the enemy and assaults it with fire and movement.
- Those in the kill zone keep the fire going and shift it as the flanking element moves in.
Near vs far ambush at a glance
| Near ambush | Far ambush | |
|---|---|---|
| Enemy distance | Within grenade range | Outside grenade range |
| Kill-zone element | Assault straight through, onto the enemy | Return fire, suppress, hold |
| Free element | Suppress immediately, shift fire | Flank via covered route, assault |
| Direction of movement | Forward, through the kill zone | Lateral, around a vulnerable flank |
| One-line summary | Everyone goes through, onto the enemy | Whoever can, suppresses; whoever is free, flanks |
Break contact: how to disengage under fire
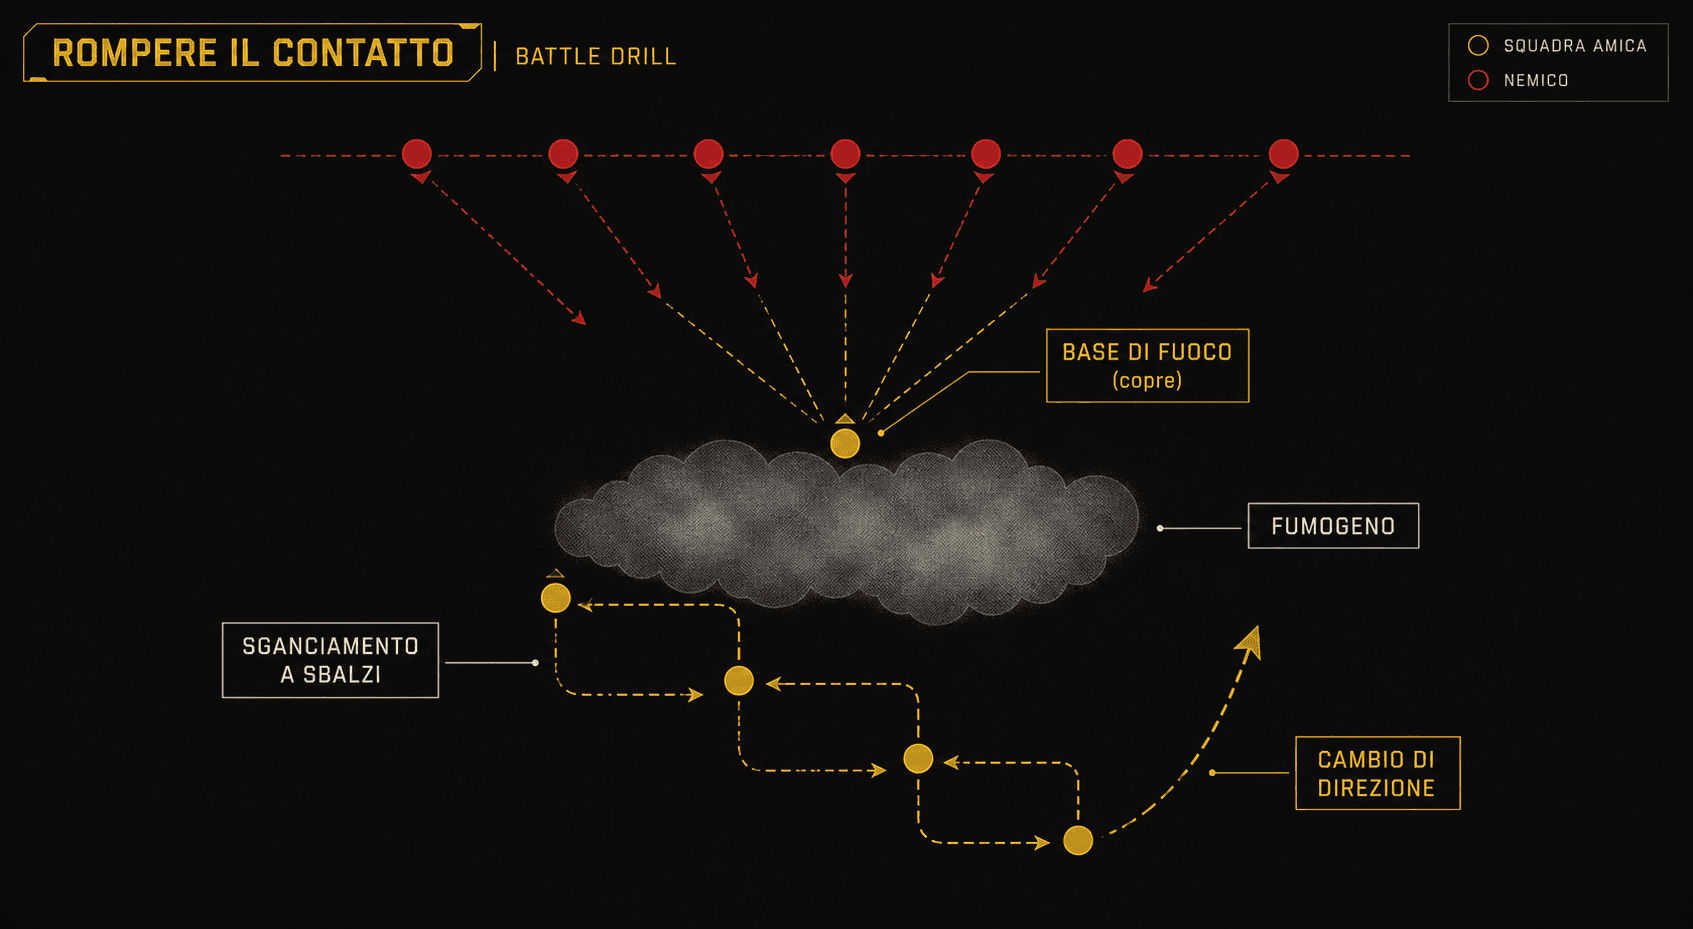
The situation: the squad is under fire and needs to disengage — to fall back without being destroyed. Breaking contact is every bit as tactical as attacking. Falling back in a line, backwards, in a panic, hands the squad to the enemy. Breaking contact properly preserves everyone for the next objective.
The sequence:
- The leader orders one element to support the disengagement of the rest — that element becomes the base of fire and keeps suppressing the enemy.
- The leader gives the first moving element a direction and distance (or a terrain feature, or the last rally point) as a destination.
- The moving element uses smoke to mask its movement, occupies the designated position, and from there starts engaging the enemy.
- Now the element that was covering moves — protected by the first. This is reverse bounding overwatch: the squad bounds away from the enemy, always with someone covering.
- It is repeated until contact is broken.
- Once contact is broken, the leader changes the direction of movement — making it harder for the enemy to regain contact or pursue.
- If the squad has become disorganised, everyone moves to the last agreed rally point.
- At the rally point: head count, reorganisation, and the mission continues.
Squad attack: assaulting an enemy position
When the squad decides to take an enemy position, the attack follows five steps. It is, in effect, react to contact followed by a deliberate decision to assault.
- Action on contact. Whoever takes fire seeks cover or concealment and returns a high volume of fire. The element in contact consolidates; the element not in contact takes cover and secures the flanks and rear. The squad leader moves toward the element in contact.
- Locate the enemy. The element in contact pins down the enemy positions and starts placing well-aimed fire. The squad leader positions where he can observe and assess.
- Suppress the enemy. The leader decides: can the element in contact get and hold suppressive fire? If yes, he sustains it — no pauses; the pairs time their fire so they never reload at the same moment, so someone is always shooting. If no, he brings another element up to reinforce the fire.
- Assault. With the enemy suppressed, the leader decides whether the other element can manoeuvre. He leads the assault element along a covered route to a flank of the enemy position. In position, he gives the agreed signal for the support element to shift its fire to the side opposite the assault — so it does not hit the teammates. The assault element fights through the position with fire and movement, low and bounding.
- Consolidate and reorganise. Having taken the position, the squad is more vulnerable — the enemy can counterattack. Establish immediate 360° security, assign sectors, redistribute ammunition and people, and only then push on.
Setting an ambush: airsoft ambush tactics
The ambush is the natural weapon of woodland fighting — surprise, concentrated fire at short range, and a planned withdrawal. It is the one drill where you choose the time and place, and the enemy chooses nothing. Indoors the same logic runs short and fast — CQB room clearing turns these drills into stack-and-slice work at arm’s length.
Types and formations
- Hasty: you spot the enemy in time to set the ambush without being detected yourself.
- Deliberate: planned against a specific target, in a chosen location.
- Point ambush: a single kill zone. Area ambush: several point ambushes linked together.
- Linear formation: support and assault run parallel to the enemy’s path, along the kill zone — flanking fire down the whole enemy column.
- L formation: the assault forms the long arm (parallel to the enemy movement); the support forms the short arm, at a right angle — strong on a sharp bend in a trail.
Principles for setting one
- Security occupies first. It protects the flanks and gives early warning, and it must be in position before the support and assault elements move.
- Fire only on the agreed signal — firing early ruins the entire ambush.
- Recon the withdrawal routes and mark the rally points in advance.
- The fundamentals are the same as a squad attack: surprise, coordinated fire, violence of action, planned withdrawal.
- When it is over, withdraw in the reverse order of occupation; leave no trace.
Everything that makes an ambush work — security, the trigger signal, fire discipline, the withdrawal — is exactly what an untrained squad lacks. That is why a well-set ambush by disciplined beginners beats a disorganised team of veterans. The ambush rewards rehearsal more brutally than any other drill.
Rehearse to reflex
Every drill above shares one requirement: it has to be rehearsed until it is instinct. Read on its own, “assault through the kill zone” is just a sentence. Under the first burst of BBs cracking past your head, that sentence has to fire before conscious thought does — or it will lose to the instinct that screams run.
Walk the drills slowly first, then at speed, then in poor light, then with someone shouting. Rotate who plays the leader so the squad does not collapse when one person is tagged. Agree the signals — voice, whistle, hand — and rehearse the fire handoff specifically. If your squad uses hand signals, the silent versions of each drill are worth a separate rehearsal of their own.
Every battle drill collapses the same way: the squad scatters under fire and loses track of where everyone is. The leader cannot assess a flank he cannot see, the support element cannot shift fire off an assault element it has lost, and a break-contact turns into a rout when nobody knows where the rally point is relative to them. This is precisely the gap Tattica Six closes. The live GPS map shows who is where the instant contact starts — the leader sees the real shape of the squad, not a guess. Push-to-talk voice carries the leader’s decision — “assault through, I am flanking right” — to every operator instantly, even spread across the woods. And rally points can be pre-marked in the shared mission briefing, so “fall back to the last rally point” means the same place on every screen. The drill stays a drill because the squad never loses itself.
FAQ
What is a battle drill in airsoft?
A battle drill is a trained collective action the whole squad performs the same way, at the same time, almost without orders — by reflex. It comes from military doctrine and survives in airsoft because its value is exactly that: nobody has to stop and discuss. The squad reacts as one. A drill is only a drill once it has been rehearsed enough that fear and noise can’t break it.
What do you do in an airsoft ambush — assault or fall back?
It depends on distance. In a near ambush — the enemy within grenade range — the players in the kill zone assault straight through it, toward the enemy. Stopping in the kill zone is death; falling back through it is death; the exit is forward. In a far ambush, those under fire suppress while the players who are free move along a covered route to a vulnerable flank and assault from there.
How do you break contact safely in airsoft?
One element stays put and suppresses while the rest peel back to a designated position, then it becomes the moving element under the cover of the others — reverse bounding overwatch, always with someone covering. Use smoke to mask the movement, change direction once contact is broken, and if the squad has scattered, everyone converges on the last agreed rally point for a head count and reorganisation.
What is the most critical moment of a squad attack?
The fire handoff. When the assault element reaches the enemy flank, the support element must shift its fire to the side opposite the assault so it doesn’t hit its own teammates. The support has to keep eyes on the assault element at all times and shift on the agreed signal. Without a rehearsed signal and discipline, you shoot your own squad — which is why this step is drilled before anything else.
Coordinate your next game with Tattica Six
Live GPS map, push-to-talk and shared briefing — for the squad that takes airsoft seriously.
Explore Tattica Six